Home › Forums › Guitar Techniques and General Discussions › Some very useful exercises based on scales
- This topic has 2 replies, 2 voices, and was last updated 1 year, 5 months ago by
 Jean-Michel G.
-
AuthorPosts
-
-
April 8, 2024 at 9:06 am #367375
Classical guitarists all over the world usually spend a huge amount of time working on the so-called “Segovia scales”. As the name implies, these scales were specifically designed by Andres Segovia, primarily to allow his students to work on position shifts.
But as we will see, they can actually be used in many different ways.Warning: you should not consider the Segovia scales as an end in itself. In particular, they are by no means the recommended way to play scales in practice!
Below you will find two of 24 Segovia scales: the D major scale (covering two octaves) and the G major scale (covering three octaves). The numbers indicate fretting fingers:
1 = index
2 = middle
3 = ring
4 = pinky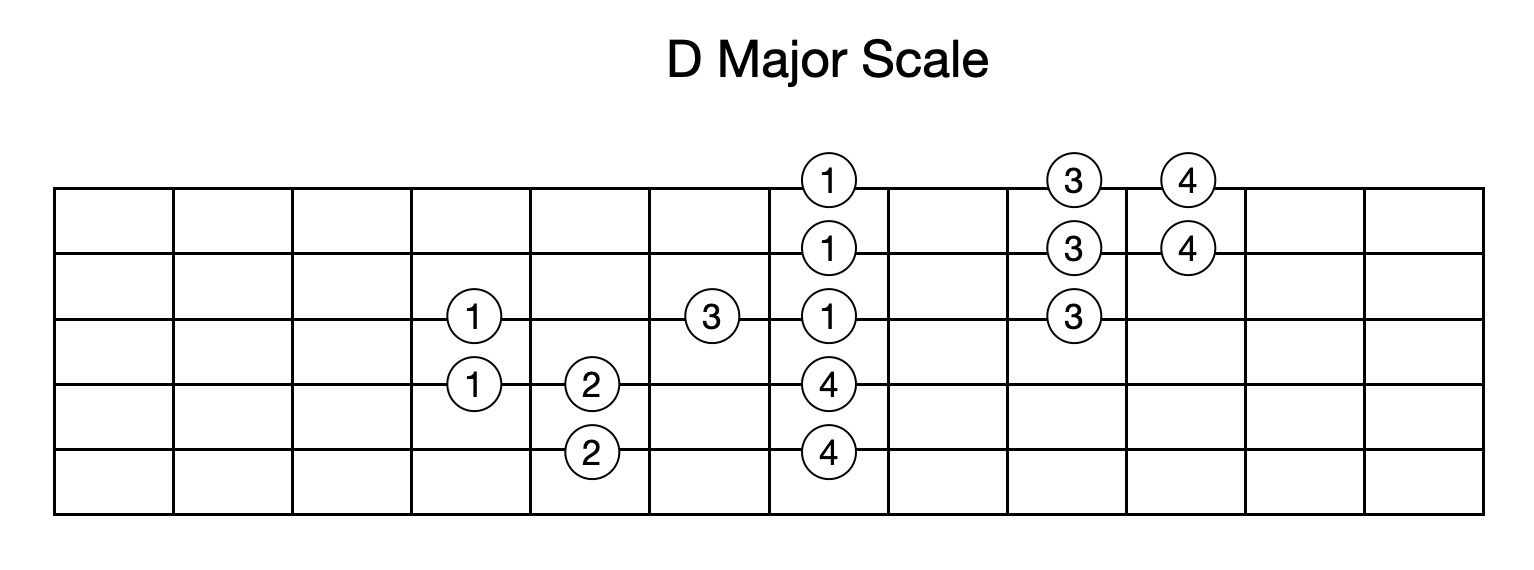

I suggest you start with the D major scale before trying the G major scale. Please note: for the G major scale the patterns for going up or down the scale are different!
(You’ll easily find the other 22 Segovia scales on the internet).Now let’s get down to work.
1. Learn the pattern until you can play it flawlessly. Make sure you sing every note as you play it, spelling its name (it’s ok to sing an octave lower if you can’t reach the higher notes).
Now play the same scale again, but visualize the corresponding CAGED chord as you go. For the D major scale this is easy as there are only two CAGED positions: E and D. But the G major scale covers three octaves and the way back is different from the way up, so more CAGED positions are traversed (even if only two notes of a position are used).
The purpose is to become aware of where you are on the fretboard.2. Play the scale up and down using the following sequences for the scale degrees:
(1 3) (2 4) (3 5) (4 6) … (1 6) (7 5) …
(1 2 3 4) (2 3 4 5) (3 4 5 6) …
(1 2 4 3) (2 3 5 4) …
(1 2 3) (2 3 4 ) (3 4 5) …
(1 3 5) (2 4 6) (3 5 7) (4 6 1) …
Make sure to only use notes that belong to the Segovia pattern (it’s ok to adapt the fingering when needed: it’s actually part of the exercise).
If you play finger style, use a variety of picking finger combinations: PI, PM, PA, IM, IA, PIM, IMA, etc …3. Sing out loud a note, and then try to play that very note in the pattern (a form of pitch recognition exercise combined with fretboard knowledge).
4. Play the scale up and down in eighth notes, setting the metronome at 60 bpm (that should not be a problem; if it is, slow down). Pay particular attention at the position shifts. It should be virtually impossible to hear them! To make sure, record yourself and evaluate your performance. Any “squish” or “zzzz” or whatever means back to square one!
If you are very critical with yourself, you’ll find this extremely difficult.
When you think your position shifts are OK, speed up by 10 bpm and start over…
We have a double target here:
– to be able to maintain a given speed despite position shifts
– to be able to play very smooth position shifts
You can (should) of course combine this with all the previous exercises!Have fun!
-
April 8, 2024 at 3:18 pm #367385
J-M,
Is there an error in the D major diagram. Should the B string pattern be 1,2,4 for a G note rather than G#?
John -
April 9, 2024 at 1:04 am #367394
Oooops! You’re absolutely right of course! My bad…
Thanks for pointing that out, Hawkeye John 😉
Here is the corrected diagram: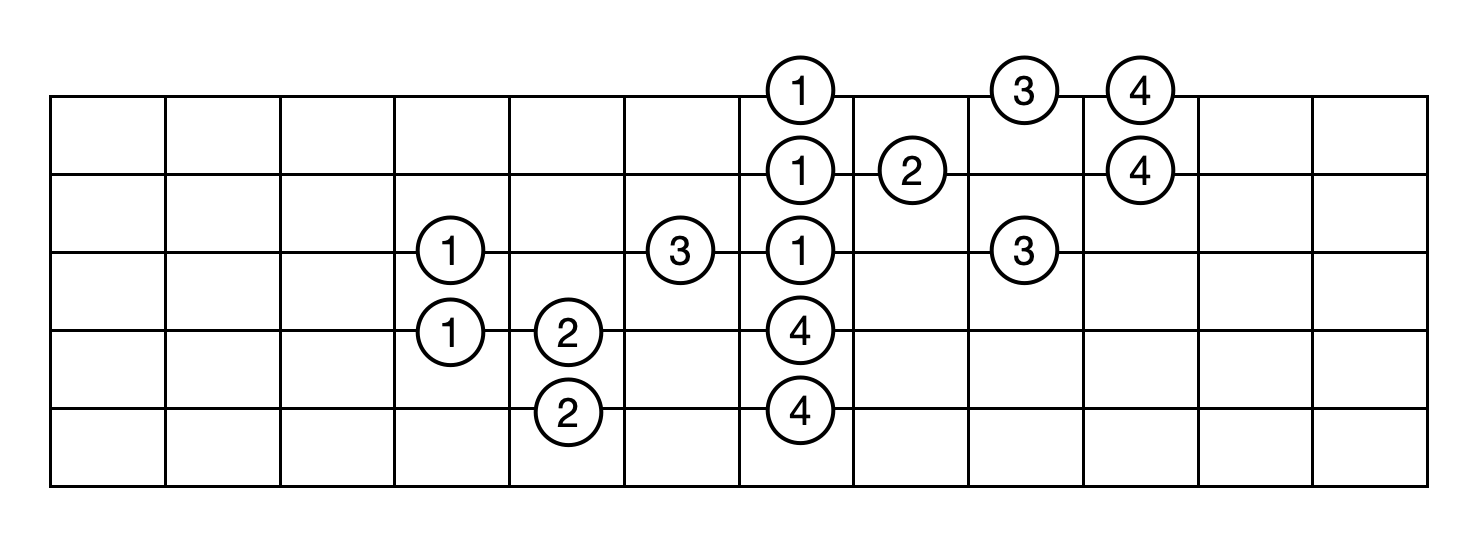
By the way, just in case you are curious, there aren’t 24 different Segovia “patterns”!
For example, the same pattern is used for C, Db, D and Eb major.
Similarly, the same pattern is used for Gb/F#, G, Ab, A, Bb and B (which, on an acoustic guitar, is very challenging!).
-
-
AuthorPosts
- You must be logged in to reply to this topic.